In the last post, I talked about how important it was that web pages load quickly so preventing your readers having to wait too long before seeing your content. Uploaded photos are one of the main causes of slow pages and this post looks into this issue and gives some suggestions about how to handle it effectively to give faster page load times.
Evidence
Firstly, let’s see some evidence for the culpability of images. The http archive is a great source of information about web pages and the graph below shows the average composition of web pages over the last 6 months.
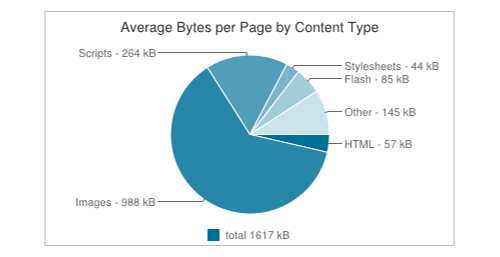
Without going into the detail, we can see from the pie chart (source) that images make up the majority (62%) of the size of the average web page. Mostly these images are jpeg files which are the type of images that you would upload from your digital camera or mobile phone. Anything we can do to reduce the size of the images placed on our web sites will speed up the load times.
What is size?
In the context of images and photos the word size can have two meanings:
- The number of pixels wide and the number of pixels high. Let’s refer to this as the image’s dimensions.
- The number of bytes an image occupies when it is stored on disk. Let’s call this image weight. Generally speaking the larger the dimensions, the more bytes it takes up – but more on that later.
Our aim should be to keep the image weight to a minimum because, when your web page is transmitted to a screen, all those bytes have to travel across the network (Wi-Fi, 3G mobile or whatever it may be). Fewer bytes means faster transmission.
Action 1 – Resize Images
A photo taken with a fairly average phone camera is likely to be somewhere around 3000 pixels by 2000 pixels or an expensive professional digital camera may produce images that are 7000 pixels by 5000 pixels or more. This is great for seeing the detail but even the dimensions of the smaller of these two images is more than double the size of an average laptop screen!
So, the first thing we should do before uploading an image to a website is to reduce its dimensions to the maximum size it can ever be shown at on your web page. There’s little point uploading an image that is 3000px by 2000px if it is only ever going to be shown on your website at 500px by 300px. If you do upload a larger image, the browser will conveniently shrink it to the necessary dimensions on screen (usually) but the much bigger image has to be transmitted over the network before this can happen.
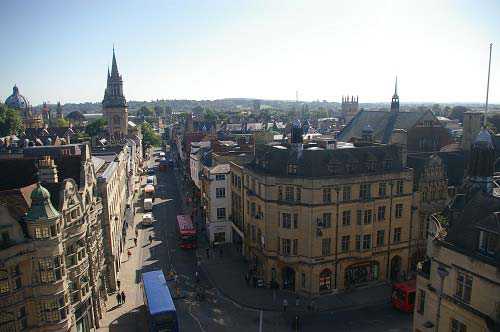
Here’s an example. I took this picture of Oxford High Street last summer on my oldish compact digital camera and it was 3008px by 2000px and 2,347,945 bytes. If I was going to display this image on a web site I would probably not want it to be bigger than 500px wide. So let’s resize it to 500px by 332px.
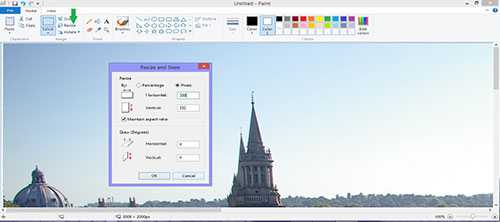
There are a number of tools available to handle image resizing and compression. On Windows, the easiest way to resize an image is to use Windows Paint as seen in the image above. Just by reducing the dimensions, the size on disk has dropped to 131,004 bytes – so it is only 6% of its original size.
Action 2 – Compress Images
However, there’s more we can do. Software is available that can compress images to much smaller sizes without significant loss of quality (I’ll give some examples of these later). I have just compressed this same image – it keeps the same dimensions but its weight has reduced to 28,771 bytes which is just over 1% of the original – we have saved over 2 million unnecessary bytes from being transmitted across the network. That’s a huge saving in anyone’s books and will make a big difference to the experience that your site visitors have on your web page.
WordPress
If you’re running a WordPress site, then much of this resizing and compression is done for you automatically. When you upload an image to WordPress it will create several (usually 3) different versions, each of different dimensions (which can be changed) and, in doing so, it has a go at compressing those images too. Compression can usually be improved, especially on the images with larger dimensions, so if you are concerned about this, there is additional software than can be installed within WordPress that can squash the images down still further to optimise the page load speed.
The latest version of WordPress (3.9) allows you to resize images easily within posts and pages which is great for getting the layout right. However, be aware that this does not change the image’s weight, i.e. the number of bytes it takes up when transmitted to the screen.
Other tools
If you’re not using a system that will automatically optimise images or if you want to handle the image compression yourself, here are three options:
- JPEGmini - you can use this for free but you can only compress one photo at a time. If you want more, you would need to purchase the software.
- reSmush.it - a free tool
- Kraken.io – this seems to offer the best size reductions and it’s also free. And, unlike JPEGmini, you can compress multiple files via their web interface.
If you need any help with any of these tools, please let me know.
Conclusion
As a web site owner, faster page load times are good for the people who visit your site and it will also contribute to better search rankings in Google. By using some of the techniques I have covered here, you should be able to improve your page load speed, giving your visitors a better experience of your site, so improving the way your business is perceived.